“How do I make coffee with a percolator while camping?” Making coffee with a camping percolator involves heating water, adding coffee grounds, and letting the percolator cycle until you achieve your desired brew strength. This article offers detailed percolator camping instructions, tips, and tricks for the best outdoor coffee brewing experience.
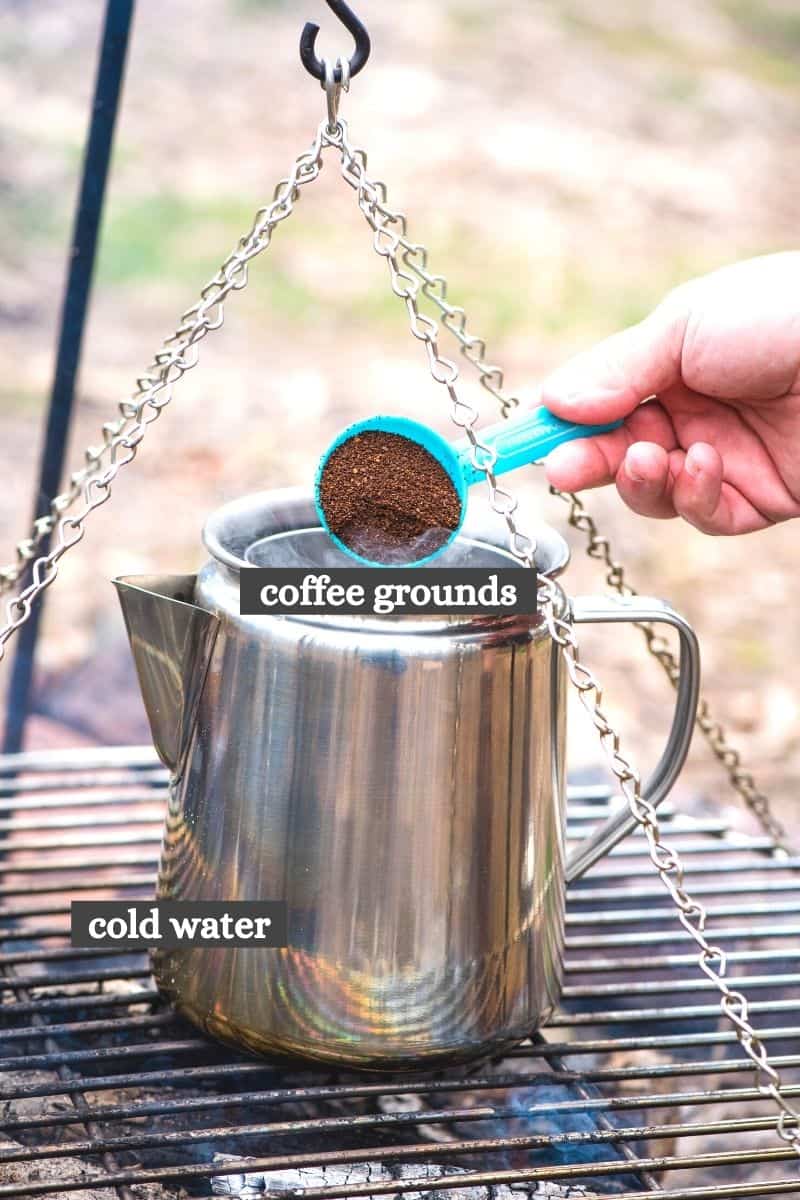
Image Source: adventuresofmel.com
The Allure of Camping Percolator Coffee
There’s something uniquely satisfying about enjoying a hot cup of coffee brewed over a campfire. The rich aroma mingling with the fresh outdoor air, the gentle bubbling sound of the percolator – it’s an experience that connects us to nature and adds a special touch to any camping trip. This isn’t just about caffeine; it’s about ritual, relaxation, and savoring the moment. A camping percolator offers a simple and reliable way to achieve that perfect brew, far from electric outlets and fancy equipment.
What is a Percolator, and Why Use One for Camping?
A percolator is a type of coffee maker that brews coffee by repeatedly cycling boiling water through coffee grounds. It’s a stovetop or campfire-friendly device consisting of a pot, a tube leading from the bottom of the pot to a perforated basket near the top, and a lid, often with a glass or plastic knob for observing the brewing process.
Why choose a percolator for outdoor coffee brewing?
- Durability: Percolators, especially those made from stainless steel or enamel, are built to withstand the rigors of camping.
- Simplicity: They have few moving parts, making them less likely to break down in the field.
- No Electricity Needed: Perfect for off-grid adventures, as they work directly on a campfire or camping stove.
- Capacity: Percolators can brew large batches of coffee, ideal for groups.
- Classic Coffee Flavor: Many coffee lovers appreciate the bold, full-bodied flavor that a percolator produces.
Gear You’ll Need for Percolator Coffee Camping
Before heading out, gather these essential items:
- Camping Percolator: Choose a size appropriate for your group.
- Coffee Grounds: Select your favorite coffee, pre-ground or grind your own. A coarser grind is generally recommended.
- Water: Bring enough fresh, clean water for brewing and cleaning.
- Heat Source: Campfire, camping stove, or portable propane burner.
- Lighter or Matches: For lighting the fire or stove.
- Measuring Utensils: Spoons or a small cup for measuring coffee grounds.
- Mug or Cup: For enjoying your coffee!
- Pot Holder or Gloves: To handle the hot percolator.
- Towel: For cleaning up spills.
- Optional: Coffee Filter: Paper filters can help reduce sediment in your coffee.
Step-by-Step: Percolator Camping Instructions
Here’s a detailed guide to making a great cup of percolator coffee while camping:
1. Preparing Your Percolator
- Cleanliness is key: Ensure your percolator is clean before starting. Remove any old coffee grounds or residue. A quick rinse is usually enough.
- Assemble the percolator: Make sure the tube is securely in place and the basket sits correctly at the top of the tube.
2. Measure and Add Water
- Water Level: Fill the percolator with cold water to just below the bottom of the coffee basket. Avoid overfilling, as this can cause the water to boil over.
- How much water?: A good starting point is to fill the percolator to about 1 inch (2.5 cm) below the bottom of the coffee basket.
3. Add Coffee Grounds
- Percolator Coffee Grounds Ratio Camping: A general guideline is 1-2 tablespoons of ground coffee per cup (6 oz) of water. Adjust to your taste. For a bolder flavor, use more coffee.
- Even Distribution: Place the coffee grounds evenly in the basket. Avoid compacting the grounds too tightly.
- Paper Filter (Optional): Line the basket with a paper filter to reduce sediment in your coffee. This is particularly helpful if you are using a fine grind.
Percolator Coffee Grounds Ratio Chart for Camping
| Water (Cups – 6 oz) | Coffee Grounds (Tablespoons) |
|---|---|
| 4 | 4-8 |
| 6 | 6-12 |
| 8 | 8-16 |
| 10 | 10-20 |
| 12 | 12-24 |
4. Assemble and Heat
- Secure the Lid: Make sure the percolator lid is securely in place.
- Heat Source: Place the percolator on your campfire grate or camping stove.
- Heat Control: If using a campfire, position the percolator away from the hottest part of the flames to prevent overheating.
5. The Percolation Process
- Watch the Knob: Observe the glass or plastic knob on the lid. You’ll see clear water start to bubble up the tube and through the coffee grounds.
- Adjust Heat: Once the water starts percolating, reduce the heat slightly to maintain a slow, steady cycle. Rapid boiling can lead to bitter coffee.
- Percolation Time: A typical brewing time is 7-10 minutes after percolation begins. Adjust to your preferred strength. Longer brewing will result in stronger coffee.
6. Stop and Let Settle
- Remove From Heat: Once your coffee reaches the desired strength, remove the percolator from the heat source.
- Let it Settle: Allow the coffee to sit for a minute or two to let the grounds settle to the bottom. This will minimize sediment in your cup.
7. Serve and Enjoy
- Carefully Pour: Pour the coffee slowly and carefully to avoid disturbing the grounds at the bottom of the percolator.
- Add-Ins: Add sugar, milk, creamer, or any other desired flavorings.
- Savor the Moment: Relax and enjoy your freshly brewed camping coffee!
Percolator Coffee Camping Tips and Tricks
- Coarse Grind: Use a coarse grind of coffee. A finer grind can clog the percolator and result in bitter coffee.
- Pre-Heat Water: If possible, pre-heat the water before adding it to the percolator to shorten brewing time, especially in cold weather.
- Filter Alternatives: If you don’t have paper filters, improvise with cheesecloth or a clean cotton cloth.
- Heat Management: Controlling the heat is crucial. Too much heat will cause the coffee to boil and taste bitter. Experiment with different heat levels to find what works best for your setup.
- Grounds in your Coffee?: To minimize grounds ending up in your coffee, try adding a paper filter to the basket. You can also use a larger grind size or carefully pour the coffee slowly so that the coffee ground stay at the bottom of the percolator.
- Campfire Coffee Method – When using a campfire, place the percolator on the edge of the fire or on a grate that’s not directly over the flames. Rotate the percolator occasionally to ensure even heating.
- Experimentation is Key: Don’t be afraid to experiment with different coffee grounds, ratios, and brewing times to find your perfect cup.
- Cleaning Up: After brewing, allow the percolator to cool before cleaning. Discard the coffee grounds and wash the percolator with soap and water.
Choosing the Best Coffee for Camping Percolator
The best coffee for camping percolator often comes down to personal preference, but here are a few things to consider:
- Roast: Medium to dark roasts tend to work well in percolators, as they have a bolder flavor that can stand up to the percolation process.
- Grind: As mentioned earlier, a coarse grind is generally recommended to prevent clogging and bitterness.
- Pre-Ground vs. Whole Bean: Pre-ground coffee is convenient, but whole bean coffee that you grind yourself will provide the freshest flavor. If grinding your own beans, do so just before brewing.
- Brand: Experiment with different brands and blends to find your favorite.
Recommended Coffee Bean Roasts for Percolator Camping
| Roast | Flavor Profile |
|---|---|
| Medium | Balanced, nutty, slightly sweet |
| Dark | Bold, smoky, chocolatey |
| Medium-Dark | Rich, full-bodied, with caramel notes |
Safety Considerations for Percolator Camping
- Hot Surfaces: The percolator will be very hot during and after brewing. Use pot holders or gloves to handle it.
- Stable Surface: Place the percolator on a stable surface to prevent it from tipping over.
- Fire Safety: Be mindful of fire safety when using a campfire or camping stove. Keep flammable materials away from the heat source.
- Carbon Monoxide: Never use a camping stove or propane burner inside a tent or enclosed space, as this can create a dangerous build-up of carbon monoxide.
Portable Coffee Maker Camping: Beyond the Percolator
While percolators are a classic choice, there are other portable coffee maker camping options to consider:
- French Press: Lightweight and easy to use, but requires hot water.
- Pour-Over: Simple and compact, but requires a filter and steady hand.
- AeroPress: Produces a smooth, concentrated coffee, but requires a bit of technique.
- Instant Coffee: The quickest and easiest option, but often lacks flavor.
Choosing the right method depends on your priorities: convenience, flavor, weight, and budget.
Comparison of Portable Coffee Maker Options for Camping
| Coffee Maker | Pros | Cons |
|---|---|---|
| Percolator | Durable, large capacity, no electricity needed | Can produce bitter coffee if not brewed correctly |
| French Press | Lightweight, easy to use, rich flavor | Requires careful cleaning |
| Pour-Over | Simple, compact, allows for precise brewing | Requires filters and a steady hand |
| AeroPress | Smooth, concentrated coffee, easy to clean | Requires a bit of technique |
| Instant Coffee | Quick and easy, lightweight | Often lacks flavor |
Stovetop Percolator Camping: Adapting to Different Environments
The basic principles of percolator coffee brewing remain the same whether you’re using a campfire or a stovetop. However, there are a few key differences to consider:
- Heat Control: Stovetops offer more precise heat control than campfires, making it easier to maintain a steady percolation.
- Wind Protection: Stovetops often have built-in wind protection, which can help maintain a consistent brewing temperature.
- Level Surface: Ensure your stovetop is on a level surface to prevent the percolator from tipping.
- Indoor vs. Outdoor: Always use a camping stove in a well-ventilated area.
Fathoming the Science Behind Percolator Coffee
The unique flavor of percolator coffee comes from the repeated cycling of hot water through the coffee grounds. Each cycle extracts more flavor and caffeine, resulting in a bold, full-bodied cup. However, this process can also lead to over-extraction and bitterness if not carefully managed.
Here’s a simplified explanation:
- Heating: Heat is applied to the water in the bottom chamber.
- Percolation: The heated water rises through the tube and into the coffee basket.
- Extraction: The hot water saturates the coffee grounds, extracting flavor, oils, and caffeine.
- Cycling: The brewed coffee drips back down into the bottom chamber, where it is heated again and the process repeats.
- Over-Extraction (Potential Issue): If the coffee is brewed for too long or at too high a temperature, the repeated cycling can lead to over-extraction of bitter compounds.
Frequently Asked Questions (FAQ) About Percolator Coffee Camping
- Can I use pre-ground coffee in a percolator? Yes, you can. Just ensure it’s a coarse grind to prevent clogging.
- What is the best coffee-to-water ratio for a camping percolator? Start with 1-2 tablespoons of coffee per 6 oz of water, and adjust to taste.
- How long should I percolate my coffee? 7-10 minutes after percolation begins is generally recommended.
- How do I prevent bitter coffee in a percolator? Use a coarse grind, control the heat, and don’t over-brew.
- Can I use a percolator on a gas stove? Yes, you can. Just ensure the stove is stable and use a medium-low heat.
- How do I clean a camping percolator? Wash it with soap and water after each use. You can also use a baking soda paste to remove stubborn stains.
- Is a percolator better than a French press for camping? It depends on your preference. Percolators are more durable and can brew larger batches, while French presses offer a richer flavor.
- What should I do with the coffee grounds after brewing? Dispose of them responsibly. Pack them out in a sealed bag or bury them in a shallow hole far from water sources.
- Can I use a camping percolator at home? Absolutely! Percolators can be used on any stovetop.
- How do I stop coffee from spurting out of my percolator knob during brewing? Reduce the heat slightly to achieve a gentler, steadier percolation.
- Are coffee percolators worth it? For campers who value durability, simplicity, and the ability to brew large batches without electricity, a percolator is well worth it.
Conclusion: Mastering the Campfire Coffee Method
Making coffee with a percolator while camping is a rewarding experience that combines the joy of the outdoors with the simple pleasure of a great cup of coffee. By following these percolator camping instructions, tips, and tricks, you’ll be well on your way to brewing the perfect outdoor coffee. Experiment, refine your technique, and most importantly, savor every sip! Now, get out there and enjoy the best campfire coffee you’ve ever had!
My name is Gareth Lewis, and I’m the voice behind CampingGuider.com.. I created this space to share my passion for camping and the great outdoors. With years of experience and countless adventures under my belt, I aim to inspire and guide fellow enthusiasts. Whether you’re a seasoned camper or a curious beginner, my goal is to provide you with practical tips, honest reviews, and insights to help you make the most out of your outdoor escapades. Join me on this journey, and let’s explore the beauty of nature together!