What is camping trailer winterization? Camping trailer winterization is the process of preparing your RV or travel trailer for cold weather to prevent damage from freezing temperatures. This involves draining water lines, adding RV antifreeze, and protecting vulnerable components. This guide offers RV winterizing tips and a comprehensive winterize camper checklist to ensure your rig is safe all winter long.
Winter can be a challenging time for camping trailers. If you don’t prepare properly, freezing temperatures can cause significant and costly damage. Lines can burst, appliances can crack, and the whole water system could need replacing. Fortunately, with proper planning and the right steps, you can protect your investment and ensure your camping trailer is ready for spring adventures. This guide will walk you through everything you need to know about camping trailer winterization.
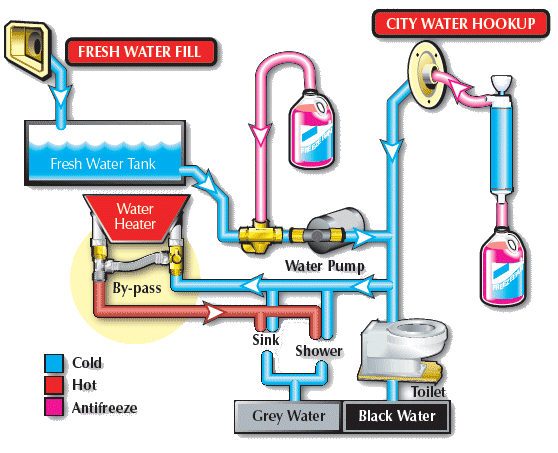
Image Source: gagscamperway.com
Why Winterize Your Camping Trailer?
Failing to winterize can lead to extensive damage. Water expands when it freezes, putting immense pressure on pipes, fittings, water pumps, and appliances like water heaters and toilets. The consequences can include:
- Burst Pipes: Expensive to repair and can cause water damage.
- Damaged Water Pump: Costly to replace.
- Cracked Fixtures: Such as faucets, toilets, and showers.
- Appliance Damage: Water heaters are especially vulnerable.
Preventing these issues is far cheaper than dealing with the repairs.
When to Winterize
The best time to winterize your camping trailer is before temperatures drop below freezing (32°F or 0°C). As a general rule of thumb:
- Act Proactively: Don’t wait for the first hard freeze. Start the winterization process when you see consistently cooler temperatures in the forecast.
- Location Matters: If you live in an area with mild winters, you might be able to delay winterizing or even skip it altogether. However, if you live in a region with harsh winters, it’s essential to winterize well in advance.
Gathering Your Supplies: Winterize Camper Checklist
Before you begin, gather all the necessary supplies. Here’s a checklist to get you started:
- RV Antifreeze: Non-toxic RV antifreeze is crucial. The amount depends on the size of your trailer. Plan on needing at least 2-3 gallons. Never use automotive antifreeze!
- Water Heater Bypass Kit (if not already installed): This will save you gallons of antifreeze.
- Water Pump Converter Kit (or tubing to connect to the pump): This allows you to pump antifreeze through the water lines.
- Wrench: For removing drain plugs.
- Screwdrivers: For various tasks.
- Plumbing Tape: For sealing connections.
- Air Compressor (optional): To blow out the water lines.
- Tank Cleaning Solution: To clean your water tanks.
- Hand Pump or Syringe: For adding antifreeze to drains and toilet.
Step-by-Step Guide: Camping Trailer Winterization
Follow these steps carefully to ensure your camping trailer is properly winterized:
1. Draining the Water System
This is the most important step in winterizing your plumbing. Remove all water from the system to prevent freezing.
- Drain Fresh Water Tank: Locate the fresh water tank drain valve (usually underneath the trailer). Open it and allow the tank to drain completely.
- Drain Water Heater: Before draining, make sure the water heater is turned off and the water is cool to avoid burns. Remove the drain plug (usually located at the bottom of the water heater). Open a hot water faucet to relieve pressure and help the water drain faster. Important: Inspect the anode rod (if equipped) for corrosion and replace it if necessary.
- Bypass the Water Heater: Once the water heater is drained, use the bypass kit to isolate it from the rest of the water system. This prevents you from filling the water heater tank with gallons of antifreeze.
2. Draining Water Lines
There are two primary methods for draining water lines: using compressed air and using RV antifreeze. Many people use a combination of both.
Method 1: Using Compressed Air
- Connect Air Compressor: Attach an air compressor to the city water inlet.
- Set Pressure: Regulate the air pressure to around 30-40 PSI to avoid damaging the lines.
- Open Faucets: Open all faucets (hot and cold) one at a time, starting with the one closest to the water pump, and let the air push the water out. Don’t forget the showerhead and outside shower (if equipped).
- Flush Toilet: Flush the toilet to remove water from the valve.
- Repeat: Repeat this process several times for each faucet and fixture.
Method 2: Using RV Antifreeze
- Bypass Water Heater: Make sure you’ve bypassed the water heater.
- Water Pump Converter Kit: Install the water pump converter kit or connect tubing to the water pump inlet. Place the other end of the tubing into a jug of RV antifreeze.
- Turn on Water Pump: Turn on the water pump. It will draw antifreeze from the jug and pump it through the water lines.
- Open Faucets: Open each faucet (hot and cold) one at a time until you see pink antifreeze flowing out. This indicates that the water has been displaced by antifreeze. Don’t forget the showerhead and outside shower.
- Flush Toilet: Flush the toilet until you see pink antifreeze.
3. Protecting Drains and Traps
- Pour Antifreeze: Pour RV antifreeze into all sink drains, shower drains, and the toilet bowl. This protects the traps from freezing.
- Empty Gray and Black Water Tanks: Empty and flush both the gray and black water tanks thoroughly. It is important to keep the valve closed to prevent freezing. Consider adding a small amount of RV antifreeze to each tank after they are emptied.
4. Winterizing Appliances
- Ice Maker: If your camping trailer has an ice maker, disconnect the water line and drain it. You can also add RV antifreeze to the ice maker compartment.
- Washing Machine: If your trailer has a washing machine, follow the manufacturer’s instructions for winterizing. This usually involves draining the water lines and adding RV antifreeze.
5. Exterior Winter Camper Maintenance
- Seal Openings: Seal any openings where rodents or insects could enter, such as gaps around pipes or vents. Use caulk or expanding foam.
- Cover Tires: Cover the tires to protect them from UV rays and prevent dry rot.
- Inspect Roof: Check the roof for any cracks or leaks and repair them before winter.
- Battery Care: Disconnect the battery and store it in a warm, dry place. This will extend its life. Consider using a battery tender to keep it charged.
- Propane Tanks: Turn off the propane tanks and cover them.
- Wash and Wax: Wash and wax your camping trailer to protect the exterior from the elements.
- RV Cover: Invest in a good quality RV cover to protect your trailer from snow, ice, and sun damage. Make sure the cover is breathable to prevent moisture buildup.
Important Considerations: Preventing Frozen Pipes
- Insulation: Insulate any exposed pipes or water lines. Pipe insulation is readily available at most hardware stores.
- Heated Water Hose: If you plan to use your camping trailer during the winter, consider using a heated water hose to prevent the water supply from freezing.
- Skirt the Trailer: Skirting the trailer can help to insulate the undercarriage and prevent cold air from entering.
RV Storage Preparation
Proper RV storage preparation is crucial for protecting your camping trailer during the off-season.
- Clean Interior: Remove all food items to prevent attracting pests. Clean all surfaces and floors.
- Open Cabinets and Drawers: Open cabinet doors and drawers to allow air to circulate and prevent mold and mildew.
- Remove Valuables: Remove any valuable items from the trailer.
- Ventilation: Ensure adequate ventilation to prevent moisture buildup. Consider using dehumidifiers or moisture absorbers.
Winter Camper Maintenance Tips
- Regular Inspections: If possible, check on your camping trailer periodically throughout the winter to ensure everything is in good condition.
- Snow Removal: Remove heavy snow from the roof to prevent damage.
- Rodent Control: Set traps or use rodent repellent to prevent infestations.
Deciphering RV Antifreeze
It’s important to choose the correct antifreeze for winterizing your camping trailer’s plumbing.
- Only Use RV Antifreeze: Never use automotive antifreeze. It is toxic and can contaminate your water system.
- Non-Toxic: RV antifreeze is non-toxic and safe for potable water systems.
- Color: RV antifreeze is usually pink, making it easy to identify.
- Quantity: The amount of antifreeze needed depends on the size of your camping trailer. A small trailer may require 2-3 gallons, while a larger trailer may need more.
Dealing with Potential Problems
- Frozen Pipes: If you suspect your pipes have frozen, do not use a direct flame to thaw them. Use a hair dryer or heat lamp instead.
- Leaks: Check for leaks after winterizing. If you find any, repair them immediately.
- Battery Issues: If your battery is not holding a charge, consult a professional.
Alternative Winterizing Methods
While using RV antifreeze is the most common method, there are alternatives:
- Complete Drain Method: This involves completely draining all water from the system and leaving it dry. This method requires meticulous attention to detail and is not always effective in preventing freezing.
- Heated Storage: Storing your camping trailer in a heated building is the best way to prevent freezing. However, this is also the most expensive option.
Step-by-Step Winterize Camper Checklist Summary
Here’s a summary of the winterize camper checklist:
- Gather Supplies: RV antifreeze, water heater bypass kit, water pump converter kit, wrench, screwdrivers, plumbing tape, air compressor (optional), tank cleaning solution, hand pump or syringe.
- Drain Fresh Water Tank: Locate and open the drain valve.
- Drain Water Heater: Turn off and cool down, then remove the drain plug. Inspect the anode rod.
- Bypass Water Heater: Install the bypass kit.
- Drain Water Lines: Use compressed air or RV antifreeze. Open all faucets and flush the toilet.
- Protect Drains and Traps: Pour RV antifreeze into all drains and the toilet bowl.
- Empty and Flush Tanks: Empty and flush the gray and black water tanks.
- Winterize Appliances: Ice maker, washing machine (if equipped).
- Exterior Camper Maintenance: Seal openings, cover tires, inspect roof, battery care, propane tanks, wash and wax, RV cover.
- Storage Preparation: Clean interior, open cabinets and drawers, remove valuables, ensure ventilation.
By following this comprehensive guide and the included checklist, you can confidently protect your camping trailer from the damaging effects of winter weather. Taking the time to properly winterize your RV will save you money and headaches in the long run. Enjoy your camping adventures when spring arrives, knowing your rig is in top shape!
Frequently Asked Questions (FAQ)
- Can I use regular antifreeze instead of RV antifreeze? No! Never use regular automotive antifreeze in your camping trailer’s water system. It is toxic and can contaminate your water supply.
- How much RV antifreeze do I need? The amount depends on the size of your camping trailer. A small trailer may need 2-3 gallons, while a larger trailer may need more. It’s always better to have a little extra than not enough.
- How do I know if my water lines are properly winterized? The best way to know if your water lines are properly winterized is to ensure that pink RV antifreeze is flowing out of all faucets and fixtures.
- What if I forget to winterize my camping trailer? If you forget to winterize your camping trailer and temperatures drop below freezing, there is a risk of damage to your water system. If you suspect your pipes have frozen, do not use a direct flame to thaw them. Use a hair dryer or heat lamp instead.
- Where can I store my camping trailer over the winter? You can store your camping trailer at your home (if allowed), at a storage facility, or at a campground that offers winter storage.
- Who is best to hire to winterize my camping trailer? If you’re not comfortable winterizing your camping trailer yourself, you can hire a professional RV technician to do it for you. Most RV dealerships and service centers offer winterization services.
- What are the benefits of camping trailer winterization? Camping trailer winterization helps to prevent damage to your water system from freezing temperatures.
- Why is it important to bypass the water heater when winterizing? Bypassing the water heater prevents you from filling the entire tank with gallons of antifreeze, saving money and resources.
- How can I protect my camping trailer tires during winter storage? Cover the tires to protect them from UV rays and prevent dry rot.
- What is the best way to prevent rodent infestations in my stored camping trailer? Seal any openings where rodents or insects could enter and use traps or rodent repellent. Clean the interior to remove any food sources.
My name is Gareth Lewis, and I’m the voice behind CampingGuider.com.. I created this space to share my passion for camping and the great outdoors. With years of experience and countless adventures under my belt, I aim to inspire and guide fellow enthusiasts. Whether you’re a seasoned camper or a curious beginner, my goal is to provide you with practical tips, honest reviews, and insights to help you make the most out of your outdoor escapades. Join me on this journey, and let’s explore the beauty of nature together!